
How To
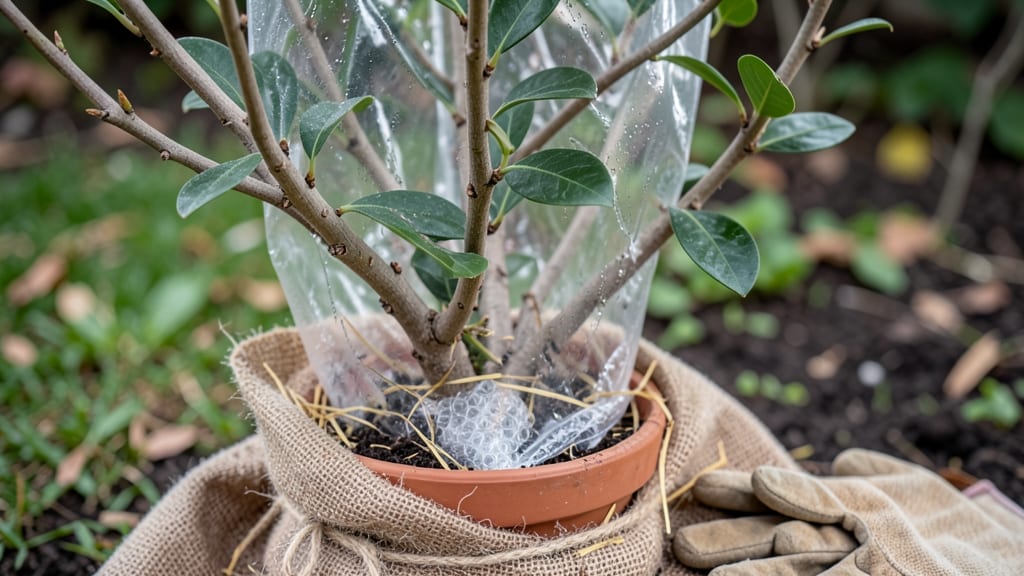
Overwintering dipladenia saves your summer blooms from winter's chill. 🌿 I've rescued more than a few neglected mandevillas from frostbite, and the secret starts with understanding their tropical roots—then giving them the right winter home.
These vines can't handle freezing temps, but with proper care, they'll bounce back stronger than ever for next season's showy flowers.
The key is mimicking their natural habitat: bright light, cool (but not cold) temperatures, and just enough moisture to keep roots happy without drowning them. Most people overwater during dormancy, which leads to root rot.
I use a moisture meter to check soil—it should stay slightly damp, not soggy. A south-facing window or grow light keeps them from stretching leggy, while temperatures between 50-60°F prevent stress.
By late winter, you'll see fresh growth signaling it's time to transition back outdoors. Gradually acclimate them to sunlight and temperatures over 2-3 weeks to avoid shock. The payoff? A dipladenia that blooms earlier and more abundantly than store-bought plants—plus, you'll save money by not replacing it every year.
Regional tweaks matter: In mild climates, a covered porch works; in harsh winters, a garage with grow lights is better. Watch for pests like spider mites (they love dry indoor air) and treat early with neem oil.
With these tricks, your dipladenia will outlast the cold and reward you with months of vibrant blooms come spring.
📚 In This Guide
- What you need
- Instructions
- Tips and common mistakes
- Wrapping up and next steps
What you need
- ● Dipladenia plant(s): 1-3 mature plants (depending on size; smaller pots overwinter easier).
- ○ Growing containers: 1-2 containers per plant (12–16 inches in diameter) with drainage holes. Optional: Self-watering pots for convenience.
- ● Potting mix: 1 bag (5–10 gallons) of well-draining cactus/succulent mix or add perlite/pumice (20–30%) to regular potting soil.
- ● Pruning tools: 1 pair of clean, sharp bypass pruners (sterilize with rubbing alcohol).
- ○ Rooting hormone: 1 small bottle (optional but helpful for propagating cuttings).
- ● Grow lights or LED bulbs: 1–2 full-spectrum grow lights (12–15 watts per plant) or 2–3 bright LED bulbs (60W equivalent).
- ● Thermometer/hygrometer: 1 digital unit to monitor temperature (ideal: 55–65°F) and humidity (40–60%).
- ● Spray bottle: 1 (for misting leaves if humidity drops below 40%).
- ● South-facing window: 1 large, sunny window (or a grow light setup if natural light is limited).
- ● Humidity tray: 1 shallow tray + pebbles + water (to boost moisture around the plant).
- ● Fertilizer: 1 bottle of balanced houseplant fertilizer (diluted to ½ strength, used sparingly—every 6–8 weeks).
- ● Insulation: 1–2 bags of mulch (straw or pine needles) or 1–2 blankets (old towels or burlap) to wrap the pot.
- ● Pot wrap: 1 roll of bubble wrap or frost cloth (for extra protection).
- ● Sturdy container: 1–2 larger pots (1–2 sizes up) to nest Dipladenia in for added insulation.
- ● Location: A sheltered spot (e.g., against a south-facing wall, under eaves, or in a garage with ventilation).
- ● 💡 Label your plants! Use a marker to tag containers—Dipladenia can look like other vines, and you’ll want to avoid confusing it with toxic lookalikes.
- ● ✨ Test drainage first: Fill the pot with water, wait 10 minutes, and ensure excess drains completely. Stagnant water = root rot.
- ● 🌡️ No sudden changes: Acclimate plants to indoor/outdoor conditions over 1–2 weeks before full transition.
Step-by-Step instructions for overwintering dipladenia
Here's how I keep my dipladenia thriving through winter—no dead branches or lost blooms in sight.
🪴 Step 1: Prune and Prepare for Dormancy
Start by giving your dipladenia a thorough pruning in late fall, just as the first frost threatens. I cut back all stems by about two-thirds, focusing on removing any dead, diseased, or leggy growth first. This isn't about aesthetics—it's about redirecting the plant's energy toward root health and next season's blooms.
Use clean, sharp pruners to make cuts at a 45-degree angle just above a leaf node or bud. This encourages new growth in the spring. After pruning, inspect the plant for pests like spider mites or scale insects. A quick spray with neem oil (if you have it) ensures they don't hibernate on your plant. Real talk: I've caught infestations overwintering before, and it's a nightmare to deal with once the plant wakes up.
☀️ Step 2: Choose the Right Overwintering Location
Dipladenia needs a cool but not freezing environment to survive winter. The ideal spot is a garage, shed, or basement with temperatures between 40-50°F. Avoid refrigerators or unheated spaces—consistent cold below 35°F will kill the plant, while temperatures above 60°F can trigger premature growth and weaken it.
Place the plant in a well-ventilated area where it gets indirect light—think bright but not direct sunlight. If you're overwintering in a basement, position it near a window with sheer curtains or under a grow light for 4-6 hours daily. You'll notice the leaves may yellow or drop slightly, but don't panic. This is normal dormancy behavior, not a sign of distress.
💧 Step 3: Adjust Watering for Winter Survival
Watering changes dramatically in winter. Instead of weekly soakings, reduce frequency to every 3-4 weeks, checking the soil first. Stick your finger 1-2 inches deep into the soil—if it feels dry, it's time to water. Overwatering is the #1 killer of overwintering dipladenia because soggy roots rot in cool conditions.
When you do water, do it thoroughly but gently. I use a watering can with a narrow spout to avoid disturbing the soil or dislodging the plant. Avoid getting water on the leaves to prevent fungal issues. If you notice the soil staying damp for more than a week, cut back further—your plant is telling you it needs less moisture.
⏰ Step 4: Monitor and Prepare for Spring Transition
Start checking your dipladenia in late winter, around 6-8 weeks before your last frost date. Look for new growth at the stem nodes—this is your cue that dormancy is ending. If you see tiny green buds or new leaves, it's time to start preparing for repotting and outdoor transition.
Gradually increase watering to every 2 weeks, and introduce bright, indirect light for 8-10 hours daily. If you're using a grow light, move it closer to the plant as new growth appears. Avoid fertilizing yet—wait until you see new leaves actively growing before adding any nutrients. I've made the mistake of fertilizing too early, and it stresses the plant out when it's still adjusting to warmer conditions.
🌱 Step 5: Repot and Acclimate for Outdoor Life
Once all risk of frost has passed and nighttime temperatures stay above 55°F, it's time to repot and reintroduce your dipladenia to the outdoors. Choose a pot 1-2 inches larger than last year's to encourage root growth without overwhelming the plant. Use a well-draining potting mix—dipladenia hates soggy roots year-round.
Hardening off takes 1-2 weeks. Start by placing the plant outside in a shaded, sheltered spot for 2-3 hours daily, gradually increasing exposure over the week. Watch for wilting or leaf drop—this means it's adjusting too quickly. Once it's spending full days outside without stress, you can move it to its permanent sunny spot. Here's the thing—dipladenia blooms best when it gets full sun (6+ hours) after acclimating, so don't rush this step.
Tips & tricks for perfect dipladenia overwintering
These cold-hardy strategies will help your dipladenia survive winter like a pro—no sad, wilted stems in sight.
Pruning Precision: When you're cutting back those two-thirds of stems in Step 1, focus on making clean cuts just above leaf nodes. This isn't just about size—it's about directing energy to those dormant buds that will become next year's blooms. I've seen plants with uneven cuts develop fungal issues during dormancy, so take your time. Use a sharp pair of pruners and make those 45-degree angles like you're drawing a perfect line—your future blooms will thank you.
Location Logic: That 40-50°F range in Step 2 is non-negotiable for dormancy success. I've learned this the hard way after watching plants suffer in refrigerators (too cold) or garages with heaters (too warm). If your basement runs cooler than 40°F, consider moving the plant to a slightly warmer spot like a closed porch or even a sunroom with windows. The key is consistent temperatures—no dramatic swings that shock the plant out of its winter rest.
Watering Wisdom: The every-3-4-weeks rule in Step 3 might seem extreme, but trust me on this: soggy roots are the silent killer of overwintering plants. Before watering, stick your finger 1-2 inches deep—if it feels dry, you're good to go. I've seen people overcompensate after years of summer watering and end up with root rot. When you do water, do it thoroughly but gently, avoiding the leaves entirely to prevent fungal growth. Think of it as giving your plant a sip of water rather than a bath.
Spring Transition Strategy: Those 6-8 weeks before your last frost date in Step 4 are your golden window for preparation. I've found that starting the light increase to 8-10 hours daily about 4 weeks before the date works best for my climate. If you notice new growth appearing earlier, don't panic—just adjust your watering schedule to every 2 weeks and keep that light consistent. The plant will tell you when it's ready to wake up fully with those little green buds at the stem nodes.
Pro Tips for Overwinter Dipladenia
- These cold-hardy strategies will help your dipladenia survive winter like a pro—no sad, wilted stems in sight.
- Pruning Precision: When you're cutting back those two-thirds of stems in Step 1, focus on making clean cuts just abov...
- Location Logic: That 40-50°F range in Step 2 is non-negotiable for dormancy success. I've learned this the hard way a...
Frequently asked questions
Got questions about keeping your dipladenia thriving through winter? Here are some of the most common concerns—and their solutions!
Can I overwinter dipladenia outdoors in colder climates?
Dipladenia (Mandevilla) is not cold-hardy—it thrives in USDA Zones 9-11. In colder zones, you’ll need to bring it indoors or use a greenhouse. If you try outdoor overwintering, expect damage below 25°F (-4°C). For extra protection, wrap the pot in bubble wrap or move it to a sheltered spot.
When is the best time to bring dipladenia inside for winter?
Start moving your dipladenia indoors before the first frost—typically late September to early November, depending on your climate. Wait too long, and cold stress can weaken the plant. Once inside, place it in a bright, indirect-light spot (like a sunroom) and reduce watering to prevent root rot.
What’s the easiest way to overwinter dipladenia without killing it?
The simplest method is to prune it back by ⅔, repot it in fresh soil, and place it in a cool (50-60°F / 10-15°C), low-light spot. Water sparingly (only when soil is dry) and fertilize lightly every 6-8 weeks. Avoid drafts—dipladenia hates sudden temperature swings!
Will my dipladenia bloom again next year if I overwinter it?
Yes! With proper care, your dipladenia can rebloom the following spring. To encourage flowers, prune aggressively in late winter (before new growth starts) and resume regular fertilization in early spring. Move it back outdoors after the last frost when night temps stay above 50°F (10°C).
My dipladenia’s leaves are yellowing—what’s wrong?
Yellow leaves usually mean overwatering or low light. Check the soil—if it’s soggy, reduce watering. If leaves are stretching or drooping, it’s craving light. Move it closer to a window (but avoid direct sun) or consider grow lights for 12-14 hours/day. Yellowing can also signal nutrient deficiency—try a balanced fertilizer.
Can I overwinter dipladenia from cuttings instead of the whole plant?
Take 4-6 inch (10-15 cm) cuttings in early fall, dip in rooting hormone, and plant in sandy soil. Keep them in a warm (70°F / 21°C), humid spot (like a propagator or sealed plastic bag) until roots form. Once rooted, overwinter them like mature plants—just smaller and slower-growing.
Wrapping up and next steps
Overwintering your dipladenia doesn’t have to be a challenge—with the right prep, you can bring back those vibrant blooms next spring! 🌸 Whether you’re digging up tubers, bringing plants indoors, or protecting them in place, consistency and care are key.
Trust your instincts, and don’t hesitate to adjust based on your local climate.
Ready to give your dipladenia the best shot at survival? Start your overwintering plan now—check your plants’ health, gather supplies, and take action before the first frost hits. Your future blooms will thank you! 🌿