
Container Gardens
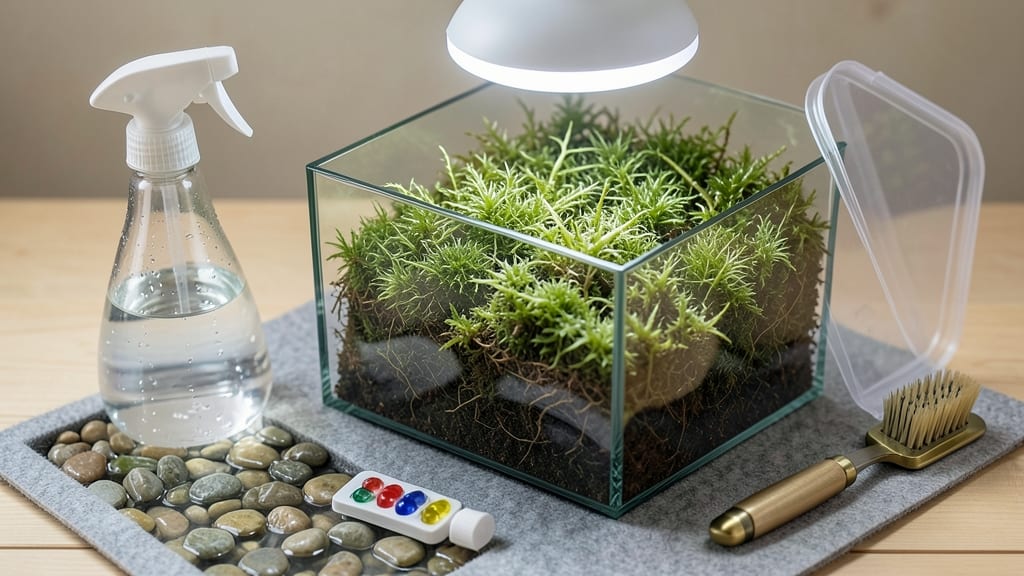
Caring for moss indoors turns dim corners into lush green havens—no fancy lighting or expensive setups required. 🌱 I’ve revived dying moss collections by fixing just two things: moisture balance and airflow.
The key isn’t complicated—it’s about mimicking a moss’s natural damp, shaded habitat right on your shelf or windowsill.
Most people overwater, thinking moss loves soggy conditions. Actually, it craves consistent dampness, not standing water. Use a spray bottle daily or mist lightly every other day, then let excess drain completely.
Sheet moss thrives in terrariums, while cushion moss prefers open containers with pebbles or sphagnum for drainage—both need 60-80% humidity to stay vibrant.
Within weeks, you’ll see that velvety green carpet filling your container, with new growth pushing outward. The trick is patience: moss grows slower than ferns but lasts years with minimal effort. Even in my dry apartment, a simple humidifier near the display keeps it thriving year-round.
Start with sheet moss if you want a soft ground cover or cushion moss for texture. Both handle low light beautifully—just avoid direct sun, which bleaches them.
The biggest mistake? Ignoring airflow. A small fan on low prevents mold while keeping moss happy. Ready to turn your space into a mini forest?
📚 In This Guide
- What you need
- Instructions
- Tips and common mistakes
- Wrapping up and next steps
What you need
- ● Live moss – Choose hypnum or polytrichum (1–2 cups for terrariums, ½ lb for larger containers). Ensure it’s pesticide-free!
- ● Container – A shallow dish, terrarium, or glass bowl (4–8 inches wide) with drainage holes (if repurposing a non-porous vessel, add a layer of pebbles first).
- ○ Growing medium – A mix of peat moss (1 part) + perlite or coarse sand (1 part) for aeration. Optional: Add a thin layer of activated charcoal (¼ inch) to prevent mold.
- ● Water – Distilled or rainwater (1–2 tbsp per watering) to avoid mineral buildup.
- ● Spray bottle – 4–8 oz with a fine mist nozzle for gentle hydration.
- ● Scissors or tweezers – For trimming or transplanting moss.
- ○ Humidity tray (optional but helpful) – A shallow tray filled with pebbles + water to boost moisture levels.
- ● Decorative elements – Miniature figurines, smooth stones, or driftwood to enhance aesthetics.
- ● LED grow light – Low-wattage (5–10W) for indirect light if natural light is limited.
- ● Moss propagation tray – For expanding your collection (clear plastic with lid works!).
- ● pH test kit – To ensure your growing medium stays acidic (ideal: 4.5–5.5 pH).
Step-by-step instructions for cultivating indoor moss gardens
Transforming moss into a thriving indoor feature is simpler than you'd think—just follow these precise steps for vibrant, low-maintenance greenery.
🌱 Step 1: Select and Prepare Your Moss Variety
Start with a live moss sample from a shaded forest floor or purchase a pre-cultured sheet from a specialty supplier. Avoid dried moss—it won’t revive. I recommend Hypnum or Thuidium for their lush texture and adaptability. Rinse your moss thoroughly under lukewarm water to remove debris, then gently squeeze out excess moisture—it should feel damp but not dripping.
If using moss from the wild, inspect for pests like slugs or snails. A quick soak in 1 part vinegar to 10 parts water for 5 minutes eliminates hidden critters without harming the moss. Spread the cleaned moss on a clean towel to air-dry slightly before planting. This step prevents mold and ensures even growth.
🪴 Step 2: Choose the Right Container and Medium
Select a shallow container with drainage holes—moss roots need airflow but hate soggy conditions. Terra cotta trays or glass terrariums work well, but avoid plastic without ventilation. For the medium, mix equal parts peat moss and perlite (or use a pre-made air-plant blend). This combination retains moisture while preventing compaction.
Layer the medium in your container to a depth of about 1 inch. Press lightly to create a firm but not dense surface—moss needs to grip something to spread. For a terrarium, arrange decorative elements like smooth stones or driftwood first, then add the medium around them. The key here is creating a natural, uneven surface that mimics moss’s wild habitat.
💧 Step 3: Plant and Mist the Moss
Spread your prepared moss evenly over the medium, pressing gently to ensure contact. For a natural look, overlap edges slightly and tuck them into crevices. If using a terrarium, arrange moss in layers, thicker in shady spots and thinner where light will hit. Mist thoroughly with distilled or rainwater (tap water’s minerals can harm moss long-term).
Cover the moss with a clear plastic dome or glass lid for the first 2-3 weeks to maintain high humidity. This mimics the damp forest floor where moss thrives. Check daily—condensation should form on the inside of the cover. Once new growth appears (usually first true shoots in 3-4 weeks), remove the cover gradually over 5 days to acclimate.
☀️ Step 4: Position and Maintain Ideal Conditions
Place your moss in indirect, bright light—think filtered sunlight through a sheer curtain. Direct sun bleaches moss, while dim corners cause it to dry out. A north-facing window is ideal, or use a grow light on a 12-hour timer if natural light is insufficient. You’ll know the light is right when the moss stays consistently green without yellowing.
Water by misting 2-3 times weekly, keeping the medium damp but never soggy. Test moisture by pressing your finger into the medium—it should feel like a wrung-out sponge. Avoid overhead watering in terrariums to prevent mold. Fertilize lightly every 2 months with a diluted seaweed solution (1 tsp per gallon) to encourage vibrant growth.
✂️ Step 5: Prune and Refresh for Long-Term Health
Trim any brown or dying patches with clean scissors to maintain appearance and prevent rot. I do this every 3-4 months, cutting just above healthy green tissue. For propagation, gently lift a section of thriving moss, rinse it, and replant it in a new container with fresh medium. Moss spreads easily—this keeps your original piece lush and creates new displays.
Every 6-12 months, refresh the medium by carefully removing the top ½ inch of old growth and replacing it with fresh peat-perlite mix. This prevents nutrient depletion and improves aeration. Moss is resilient but appreciates this rejuvenation—you’ll notice faster regrowth and richer color after refreshing.
Tips & tricks for perfect indoor moss gardens
Here's what nobody tells you about keeping moss thriving indoors—these are the little details that make all the difference between a struggling patch and a lush, vibrant display.
Wild Moss Prep: When collecting moss from nature, focus on Hypnum or Thuidium varieties—they're the most resilient for indoor growing. After your 5-minute vinegar soak, spread the moss on a clean towel and let it air-dry completely before planting. This critical step prevents mold from forming beneath the moss layers, which can smother new growth. I learned this the hard way after watching my first moss garden develop black spots within days.
Medium Texture Matters: The 1-inch depth of your peat-perlite mix isn't just about volume—it's about creating the right texture. Press it lightly but firmly to create a slightly uneven surface with tiny crevices. Moss needs these micro-terrains to establish roots properly. For terrariums, arrange decorative elements first, then build up the medium around them to create natural-looking nooks where moss can spread organically.
Humidity Transition: That 2-3 week covered period is non-negotiable for new moss gardens. Check daily for condensation on the cover—this is your humidity gauge. When you're ready to remove the cover after 5 days, do it gradually over those 5 days by lifting the cover for progressively longer periods each day. Sudden exposure to dry air can shock the moss, causing it to dry out or develop brown edges. Think of it like acclimating a houseplant to outdoor conditions.
Light Testing: The "indirect, bright light" instruction is key—direct sunlight will bleach your moss within weeks. Test your chosen spot by placing a piece of white paper near the window for a day. If the paper shows clear shadows with no fading, that's your ideal location. For grow lights, position them 12-18 inches above the moss and use a timer to maintain that 12-hour cycle. I've seen moss turn yellow and crispy when grow lights were left on too long or positioned too close.
Pro Tips for Care For Moss Indoors
- Here's what nobody tells you about keeping moss thriving indoors—these are the little details that make all the diffe...
- Wild Moss Prep: When collecting moss from nature, focus on Hypnum or Thuidium varieties—they're the most resilient fo...
- Medium Texture Matters: The 1-inch depth of your peat-perlite mix isn't just about volume—it's about creating the rig...
Frequently asked questions
Got questions about keeping your indoor moss thriving? Here are some of the most common ones—plus straightforward answers to help you avoid stress and keep your green buddy happy!
How often should I mist my indoor moss?
Mist your moss lightly every 2–3 days, or when the top layer feels dry to the touch. Over-misting can suffocate it, while too little causes browning. Aim for damp (not soggy) conditions—think of a sponge that’s been wrung out, not dripping wet.
Can I use tap water, or should I stick to distilled?
Tap water is usually fine, but if yours is hard (high in minerals) or chlorinated, opt for distilled or filtered water to prevent mineral buildup. A quick fix? Let tap water sit out for 24 hours before using to evaporate chlorine.
Why is my moss turning brown or crispy?
Brown patches usually mean too much sun (even indirect light can scorch it) or drying out. Move it to a shadier spot (like a north-facing shelf) and mist more frequently. If the edges curl, it’s thirsty—give it a gentle soak in room-temp water for 10 minutes.
How do I keep pests like fungus gnats away?
Fungus gnats love damp moss! Prevent them by not overwatering and letting the top layer dry slightly between mistings. If you spot them, sprinkle a thin layer of sand or kinetic sand on the surface—they hate it! A few drops of neem oil in the water also deters them.
What’s the best indoor spot for moss?
Moss thrives in low to medium indirect light—think bathroom windows, bookshelves, or near a north/west-facing window. Avoid direct sunlight, heating vents, or drafty areas (like near AC units). A humid spot, like a kitchen or bathroom, is ideal!
Can I grow moss in just a regular terrarium?
Yes! A closed terrarium works great, but add a small drainage layer (like pebbles) and a thin layer of activated charcoal to prevent mold. For open terrariums, mist more often and avoid overcrowding—moss needs airflow to breathe!
Wrapping up and next steps
Caring for moss indoors is all about patience, moisture, and minimal fuss—perfect for busy plant lovers!
With the right setup, you’ll soon enjoy a thriving, velvety green corner that purifies the air and adds serene beauty to your space. Start small, experiment with placement, and let nature do the rest!
Ready to dive in? Grab your moss, a cozy container, and a spray bottle—your low-light oasis is just a few steps away. 🌿✨ Refresh your materials list and begin your moss-growing journey today!