
How To
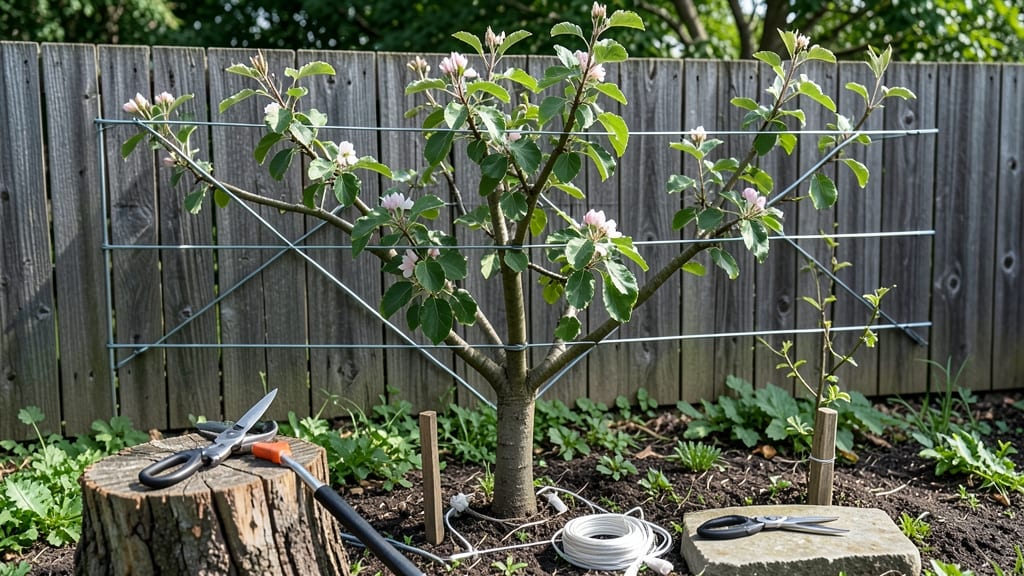
Your backyard could soon look like a French chateau orchard—without the acres. 🍏 Espaliering apple trees transforms them into elegant, space-saving works of art while delivering a steady harvest of crisp fruit.
The magic happens in how you train the branches, turning what would be a sprawling tree into a flat, decorative masterpiece against your fence or wall.
You’ll need just a few tools: sharp pruners, twine or wire for support, and a young apple tree (dwarf varieties work best). The key is patience—training takes 2-3 years to perfect, but once established, your espaliered tree will produce fruit every season with minimal effort.
I’ve trained mine into a fan shape against my garage, and the neighbors now ask for apples every fall.
The real reward? Fruit you can pick without a ladder, branches that stay accessible for pruning, and a garden feature that looks intentional (even if you’re still learning). By summer, you’ll have a tree that’s both productive and pretty—no more sacrificing space for orchard dreams.
Ready to try? Start with a single branch this spring, and let me show you how to shape it into something extraordinary. The hardest part? Deciding which wall to dedicate to it first.
📚 In This Guide
- What you need
- Instructions
- Tips and common mistakes
- Wrapping up and next steps
What you need
- ● Apple tree sapling: Dwarf or semi-dwarf variety (e.g., Malling 9 or Columnar rootstock) for easier training.
- ● Age: 1–3 years old (younger branches bend more easily!).
- ● Espalier frame or trellis: Wooden, metal, or PVC structure (e.g., T-posts, fence wiring, or a freestanding A-frame).
- ● Height: 6–8 feet (adjust based on your space and desired yield).
- ● Width: 3–5 feet (allows room for horizontal branches).
- ● Pruning tools: Bypass pruners (for clean cuts on branches up to ½ inch thick).
- ● Loppers (for thicker branches up to 1½ inches).
- ● Hand saw (for stubborn branches over 1½ inches).
- ● Tying materials: Soft plant ties or tree tape (avoid wire—it can damage bark!).
- ● Twist ties or rubber bands (for temporary support).
- ● Fertilizer: Balanced, slow-release fertilizer (e.g., 10-10-10) or organic options like compost or fish emulsion.
- ● Mulch: Organic mulch (e.g., wood chips, straw, or shredded bark) to retain moisture.
- ● Grafting tools: If you’re grafting scions onto your sapling (e.g., whip-and-tongue method).
- ● Hormone rooting powder: To encourage root growth if taking cuttings.
- ● Drip irrigation kit: For consistent watering (espalier trees need steady moisture!).
- ● Spray bottle: For misting leaves during hot, dry spells.
- ● Garden gloves: To protect your hands from thorns and rough bark.
- ● Label tags: To track varieties and pruning dates.
Step-by-Step instructions for espaliering apple trees
Transform your small garden into a productive orchard with this elegant training method.
🌱 Step 1: Select the Right Apple Variety and Young Tree
Choose a dwarf or semi-dwarf apple tree—these grow well on espalier frames and produce fruit faster. Standard-sized trees need too much space and structural support. Look for varieties like 'Gala', 'Fuji', or 'Honeycrisp' that respond well to training. I always pick a 1-2 year old tree with flexible branches, as older wood becomes brittle and harder to shape.
Check the rootstock—dwarf trees (marked as M.9 or B.9) stay compact, while semi-dwarfs (MM.106) need slightly more room. If you're unsure, ask your nursery for a cold-hardy, disease-resistant variety suited to your climate zone. The right tree makes all the difference in long-term success.
✂️ Step 2: Prune for Structure and Remove Competing Growth
Start by removing any dead, crossing, or inward-growing branches—these compete for energy and create weak crotches. Use clean, sharp pruners to make cuts just outside the branch collar (the swollen area where the branch meets the trunk). I like to make my first cuts at a 45-degree angle about ¼ inch above a bud facing the direction I want the branch to grow.
Shape the tree into a basic framework—common espalier styles include horizontal cordon, fan, or palmette. For beginners, a 3-4 branch fan shape works best. Trim back any suckers (shoots growing from the base) immediately—they drain energy from your espalier. After pruning, spray the cuts with dormant oil to prevent disease.
🪴 Step 3: Install a Support Frame and Attach Branches
Build or purchase a lightweight metal or wooden espalier frame (like a trellis or grid) that matches your chosen design. For a 4-branch fan, I use a 4-foot tall frame with horizontal arms spaced 12-18 inches apart. Secure the frame firmly to a sturdy post or wall—apple branches can get heavy with fruit.
Tie the main branches to the frame using soft tree ties or rubber bands (never wire—it can girdle the bark). Spread the branches evenly along the frame, bending them gently to the desired shape. If bending seems difficult, use a branch spreader to avoid snapping. Water the tree deeply after attaching branches to reduce stress.
☀️ Step 4: Train and Maintain Growth Through the Season
As new shoots emerge in spring, guide them along the frame by tying them loosely every 4-6 inches. Prune back any growth that exceeds the frame—you want controlled, horizontal branches with spurs (short fruiting stems). I pinch off the tips of vigorous shoots to encourage bushier growth. By midsummer, your tree should look like a neat, flat silhouette against the frame.
Fertilize lightly in early spring with a balanced 10-10-10 formula to support new growth. Avoid heavy nitrogen—it promotes leafy growth at the expense of fruit. Watch for aphids or spider mites, which love espaliered trees. A neem oil spray keeps pests at bay without harming beneficial insects.
⏰ Step 5: Harvest and Prune for Next Year’s Growth
Apples on an espalier ripen 1-2 weeks earlier than standard trees, so monitor fruit closely in late summer. Harvest when the fruit easily detaches from the tree and has reached full color. I pick apples in the morning when temperatures are cool—this preserves flavor and texture.
After harvest, do a light winter pruning to remove any dead wood, water sprouts, or branches growing beyond the frame. Thin out crowded fruit clusters in late winter to prevent overburdening the branches. Store your espaliered tree in a protected location during harsh winters if you're in a cold climate zone.
Tips & tricks for perfect espaliered apple trees
Transforming your garden into a productive orchard doesn't require acres of land—just the right approach. Here are the key insights I've learned after training dozens of espaliered apple trees.
Selection Strategy: When choosing your 1-2 year old tree, prioritize flexibility over size. I've found that trees with slightly longer branches (about 12-18 inches) give you more working length for your espalier design. Look for trees with multiple strong central leaders—these become your main branches. The rootstock matters too: M.9 dwarfs stay compact while MM.106 semi-dwarfs offer a nice middle ground for space and productivity.
Pruning Precision: In Step 2, when you're making those 45-degree cuts about ¼ inch above the bud, here's what I've learned: use your pruners to make a small notch just below the bud first—this creates a natural hinge that reduces tearing. For the fan shape, aim to space your 3-4 main branches about 6-8 inches apart at the base. This spacing gives each branch room to develop while maintaining that elegant flat silhouette. And always clean your pruners between cuts to prevent spreading disease.
Frame Flexibility: Your 4-foot tall frame with 12-18 inch spacing works perfectly, but here's my pro tip: add adjustable hooks or clips along the horizontal arms. These let you easily reposition branches as they grow, which is especially helpful when you're training new shoots in Step 4. I've had great success with powder-coated metal frames—they resist rust and last for years. For wall mounting, use L-brackets that allow slight movement; apple branches will sway in wind, and rigid attachment can cause stress points.
Growth Management: The 4-6 inch tying interval in Step 4 is perfect, but watch for these signs: if new shoots are growing faster than 1 inch per week, they're likely too vigorous. In this case, pinch back the tips to redirect energy into lateral growth. For pest control, I've found that a weekly neem oil spray during spring and summer prevents 90% of aphid infestations. The key is consistency—don't wait until you see pests before spraying. And remember, espaliered trees need about 30% less water than standard trees because their roots are more contained.
Pro Tips for Espalier Apples
- Transforming your garden into a productive orchard doesn't require acres of land—just the right approach. Here are th...
- Selection Strategy: When choosing your 1-2 year old tree, prioritize flexibility over size. I've found that trees wit...
- Pruning Precision: In Step 2, when you're making those 45-degree cuts about ¼ inch above the bud, here's what I've le...
Frequently asked questions
Got questions about espaliering apple trees? You’re not alone! Here are answers to the most common queries to help you grow with confidence.
Can I espalier any apple tree variety?
Most apple varieties can be espaliered, but dwarf or semi-dwarf trees are ideal for beginners due to their manageable size. Standard varieties may require more structural support. Look for columnar or cordón types (like ‘Columnar Delicious’) for easier training. Always check the tree’s growth habit before purchasing!
How long does it take to see fruit on an espaliered apple tree?
Patience is key! With proper care, espaliered apple trees can bear fruit in 2–4 years, though some varieties may take longer. Pruning in early spring and summer encourages faster fruiting. Tip: Fertilize lightly in spring to boost growth without overwhelming the tree.
Do I need to remove all leaves when espaliering?
No—leaves are essential for photosynthesis! However, you’ll want to thin out excess growth (especially crowded branches) to improve airflow and sunlight penetration. Aim to keep 3–5 main branches spaced evenly, pruning back to outward-facing buds for optimal fruit production.
What pests or diseases should I watch for?
Espaliered trees are still vulnerable to aphids, apple scab, and codling moths. Prevent issues with:
- Neem oil (for pests)
- Copper fungicide (for scab)
- Row covers (to deter moths)
Can I espalier an apple tree in a container?
Containers work well for dwarf varieties (like ‘Patio Pearl’). Use a 15–20 gallon pot with drainage holes and a high-quality potting mix. Place it in full sun and water consistently—containers dry out faster than ground soil. Rotate the pot occasionally for even growth.
How do I protect my espaliered tree in winter?
Young or newly espaliered trees need extra care in cold climates. Wrap the trunk with tree guards or burlap, and mulch the base with straw or wood chips. If heavy snow is expected, gently brush it off branches to prevent breakage. Evergreen boughs can also shield delicate branches from frost.
Wrapping up and next steps
Espaliering apple trees isn’t just a clever way to save space—it’s a rewarding art that transforms your garden into a living masterpiece! 🌳 With the right tools, patience, and a touch of creativity, you can grow beautiful, productive trees even in the smallest yard.
Start small, experiment with shapes, and don’t forget to enjoy the process—your future harvest (and Instagram-worthy orchard) will thank you.
Ready to get started? Grab your pruners, sketch a design, and begin training your tree today. Your space-saving orchard awaits! 🍏✨