
How To
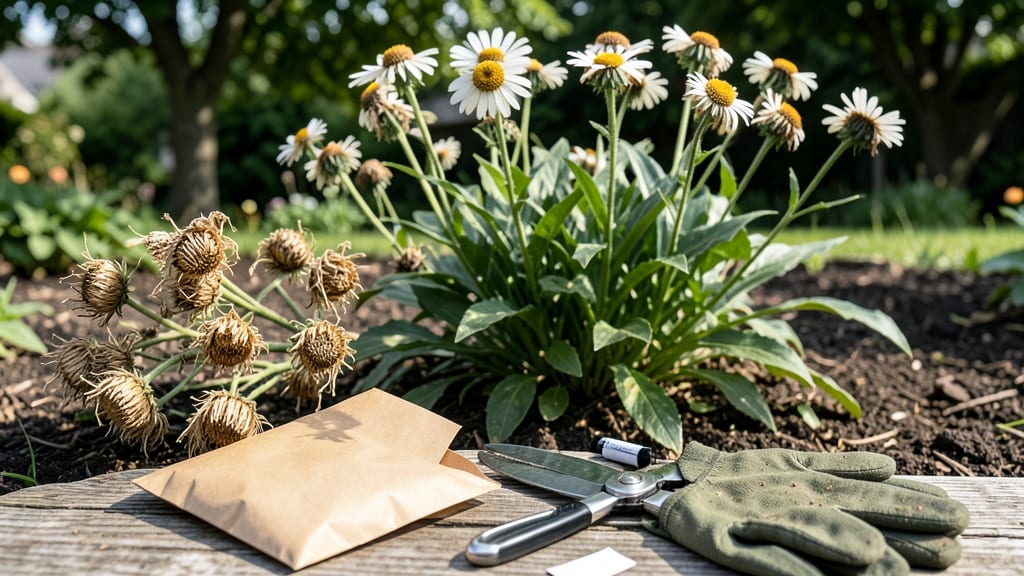
When and how to identify Shasta daisy seed heads for harvesting
Harvesting Shasta daisy seeds at the right time ensures strong, healthy blooms next season while preventing wasted effort. The key is watching for visual maturity cues—like brown centers and fluffy seed fluff—that signal perfect harvest readiness.
Timing matters because collecting too early weakens your plants' energy reserves, while waiting too long risks seed loss from weather or pests.
Start monitoring your Shasta daisies in late summer (August) when flower heads begin drying naturally. Look for fully brown centers instead of white petals, which means the seed head is mature.
The seed fluff (the white, cottony material) should be fully visible and dry to the touch, indicating the seeds are ready for collection.
Here’s what to avoid: green or moist seed heads mean the seeds aren’t ready—harvesting them too soon reduces viability. Also, skip seed heads that have been damaged by rain or pests, as these may not produce viable seeds. Always prioritize dry, intact heads for the best results.
Pro tip: Shake a seed head gently over a brown paper bag—if seeds rattle and release easily, they’re ready. If they stick or feel damp, wait a few more days. This simple test saves time and ensures you only harvest high-quality seeds.
🌼 Shasta Daisy Seed Harvest
Step-by-Step guide to harvesting and storing Shasta daisy seeds
Once you’ve identified your Shasta daisy seed heads, the next step is harvesting them correctly to preserve seed viability. Start by using clean, sharp pruning shears to cut the dried flower heads—about 2-3 inches below the base.
This ensures you capture the entire seed head while leaving enough stem for handling.
After cutting, place each seed head in a paper bag (brown lunch bags work perfectly) and label it with the harvest date and variety name. Paper bags allow airflow, which prevents moisture buildup and mold. Avoid plastic bags, as they trap humidity and can ruin your seeds.
Here’s how to dry your seed heads properly: Hang them upside down in a well-ventilated, dry space like a garage or shed. Let them dry for 1-2 weeks until the seed fluff inside feels crispy and the seeds rattle when shaken. This ensures they’re fully mature and ready for storage.
How to Harvest & Store Shasta Daisy Seeds
- 🌼 Step 1: Cut dried seed heads with pruning shears, leaving 2-3 inches of stem.
- 📋 Step 2: Place each head in a paper bag and label with date and variety.
- 🌬️ Step 3: Hang seed heads upside down in a dry, airy space for 1-2 weeks.
- ✂️ Step 4: Once dry, rub seed heads between fingers to release seeds into the bag.
- 📦 Step 5: Store sealed bags in a cool, dark place (like a refrigerator) for up to 3 years.
After drying, gently rub the seed heads between your fingers to release the seeds into the paper bag. The fluffy seed fluff will help separate them naturally. For larger batches, you can also use a seed separator sieve to speed up the process.
Store your harvested seeds in a cool, dark place, such as a sealed container in your refrigerator. Properly stored Shasta daisy seeds can remain viable for up to 3 years, though germination rates drop slightly after 1-2 years.
Test a few seeds annually to ensure they’re still good for planting.
When ready to plant, scatter the seeds on the soil surface—they need light to germinate. Lightly press them into the top layer of soil and keep the area moist until sprouts appear, which typically takes 10-14 days in ideal conditions.
Step-by-Step guide to harvesting and storing Shasta daisy seeds
Once you’ve identified your Shasta daisy seed heads, the next step is harvesting them correctly to preserve seed viability. Start by using clean, sharp pruning shears to cut the dried flower heads—about 2-3 inches below the base.
This ensures you capture the entire seed head while leaving enough stem for handling.
After cutting, place each seed head in a paper bag (brown lunch bags work perfectly) and label it with the harvest date and variety name. Paper bags allow airflow, which prevents moisture buildup and mold. Avoid plastic bags, as they trap humidity and can ruin your seeds.
Here’s how to dry your seed heads properly: Hang them upside down in a well-ventilated, dry space like a garage or shed. Let them dry for 1-2 weeks until the seed fluff inside feels crispy and the seeds rattle when shaken. This ensures they’re fully mature and ready for storage.
How to Harvest & Store Shasta Daisy Seeds
- 🌼 Step 1: Cut dried seed heads with pruning shears, leaving 2-3 inches of stem.
- 📋 Step 2: Place each head in a paper bag and label with date and variety.
- 🌬️ Step 3: Hang seed heads upside down in a dry, airy space for 1-2 weeks.
- ✂️ Step 4: Once dry, rub seed heads between fingers to release seeds into the bag.
- 📦 Step 5: Store sealed bags in a cool, dark place (like a refrigerator) for up to 3 years.
After drying, gently rub the seed heads between your fingers to release the seeds into the paper bag. The fluffy seed fluff will help separate them naturally. For larger batches, you can also use a seed separator sieve to speed up the process.
Store your harvested seeds in a cool, dark place, such as a sealed container in your refrigerator. Properly stored Shasta daisy seeds can remain viable for up to 3 years, though germination rates drop slightly after 1-2 years.
Test a few seeds annually to ensure they’re still good for planting.
When ready to plant, scatter the seeds on the soil surface—they need light to germinate. Lightly press them into the top layer of soil and keep the area moist until sprouts appear, which typically takes 10-14 days in ideal conditions.