
Orchid Care
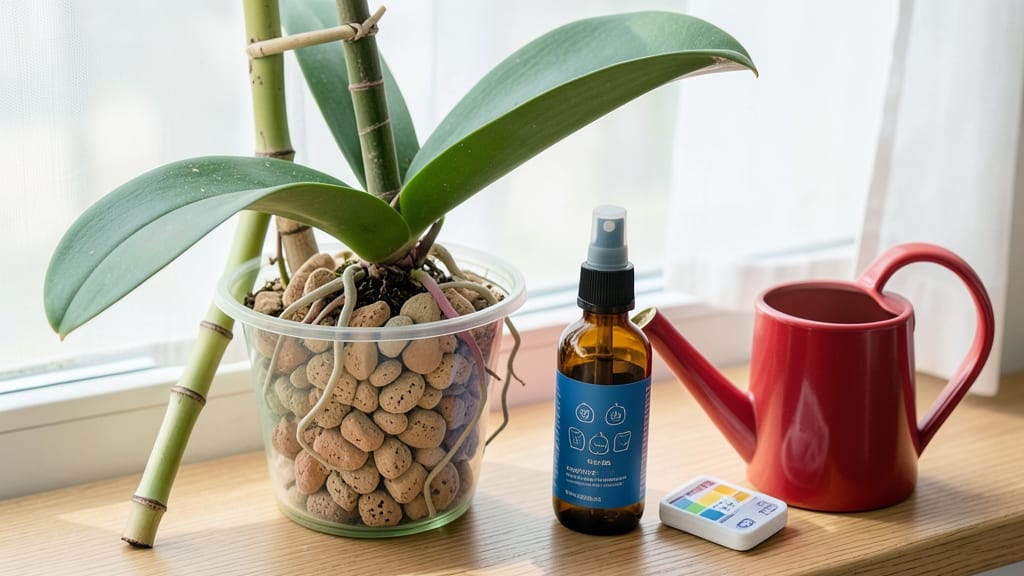
How to grow orchids in LECA feels like unlocking a secret garden—no soil, no mess, just airy roots thriving in clay pebbles. ✨ I’ve watched my Phalaenopsis bloom twice a year using this method, and the best part? No more root rot or overwatering guesswork. The key starts with choosing the right orchid varieties and preparing your LECA just right.
You’ll need a clear container, clean LECA pebbles (soaked and rinsed), and an orchid with healthy roots. The process is simpler than it looks: just nestle the roots around the clay balls, ensuring they stay slightly elevated—never buried.
Watering becomes a breeze too: soak the LECA until water runs out the bottom, then let it dry slightly between sessions. Humidity and bright, indirect light keep those blooms coming.
What you end up with is an orchid that thrives year-round, with roots you can actually see growing. The LECA stays fresh longer, and pests have nowhere to hide.
My plants now produce larger blooms and rebound faster after flowering. The only challenge? Remembering to feed your orchid every few weeks—LECA doesn’t hold nutrients like soil.
Perfect for small spaces, busy gardeners, or anyone tired of struggling with traditional orchid mixes. Once you try it, you’ll wonder why you ever used soil. Let’s get those roots growing!
📚 In This Guide
- What you need
- Instructions
- Tips and common mistakes
- Wrapping up and next steps
What you need
- ● LECA (Lightweight Expanded Clay Aggregate): 10–20 lbs (4.5–9 kg), depending on pot size. Look for #1 or #2 size (3/8"–3/4" diameter).
- ● Orchid pots: 1–3 plastic or terracotta pots (4"–6" diameter) with drainage holes (or DIY holes if needed).
- ● Orchid: 1–3 healthy orchids (Phalaenopsis, Dendrobium, or Oncidium work well).
- ● Water: Room-temperature, dechlorinated water (use a water conditioner or let it sit out for 24 hours).
- ● Hydroponic fertilizer: Balanced orchid fertilizer (e.g., Jack’s Classic Blossom Booster or Dyna-Gro Grow) diluted to ½ strength.
- ● Spray bottle: 8–16 oz for misting LECA and orchid roots.
- ● pH strips: To monitor water pH (ideal range: 5.5–6.5).
- ● Pruning shears: Small, sharp pair for trimming dead roots or stems.
- ● Tray or saucer: To catch runoff (prevents messes!).
- ● Grow lights: LED or fluorescent (12–14 hours/day) if natural light is low.
- ● Humidity tray: With pebbles and water to boost humidity (especially for tropical orchids).
- ○ Timer: For automated watering/fertilizing (optional but handy!).
- ● LECA cleaner: Vinegar or hydrogen peroxide (1:10 ratio) to sterilize LECA every 3–6 months.
Step-by-Step instructions for growing orchids in LECA
Here's how I've grown vibrant, blooming orchids using LECA—no soil, no fuss, just stunning results.
🪴 Step 1: Prepare Your LECA and Container
Start by rinsing the LECA clay pebbles thoroughly under cool water to remove any dust. Spread them on a clean towel to dry completely—this prevents mold and keeps your orchid roots healthy. For a 4-inch pot, you'll need about 2 cups of LECA (adjust for larger pots). Place a 1-inch layer of LECA at the bottom of your container to ensure proper drainage and airflow.
LECA's porous nature mimics natural air roots perfectly, but it's critical to avoid compacting it. Gently shake the pot to settle the pebbles naturally—don't press them down. This creates the right balance of air pockets and support for your orchid's roots. If you're using a clear container, you'll love watching those roots grow and thrive.
💧 Step 2: Plant Your Orchid Correctly
Remove your orchid from its current pot and gently separate the roots, loosening any that are tightly bound. Place the orchid in the center of the LECA, ensuring the rhizome (thick base where roots emerge) sits just above the pebbles. This position encourages new roots to grow downward while keeping the plant stable. For a 4-inch pot, aim to have the orchid centered with roots spreading evenly.
Don't bury the roots—LECA needs to stay loose for airflow. If you're repotting an established orchid, trim any mushy or black roots with sterilized scissors before planting. This prevents rot and gives your orchid a fresh start. Here's the thing—LECA orchids need this airflow to prevent bacterial issues, so resist the urge to pack everything tightly.
☀️ Step 3: Set Up Proper Lighting and Watering
Orchids need bright, indirect light—think east or west-facing windows, or 10-12 hours of grow light if indoors. Too much direct sun will scorch leaves, while too little light means fewer blooms. I use a LED grow light on a timer for consistent results. Place it 12-18 inches above the orchid and adjust as it grows.
Watering LECA orchids is different from soil-grown ones. Fill the container with room-temperature water until the LECA is completely saturated, then drain it thoroughly. Repeat this process 2-3 times to flush out any salts or minerals. After watering, let the LECA dry out 50-70% before watering again—check by lifting the pot (it should feel light, not heavy). Overwatering is the fastest way to kill an orchid in LECA.
⏰ Step 4: Monitor and Maintain Your Orchid
After 2-4 weeks, you'll notice new roots growing into the LECA—this is a great sign! Keep an eye out for yellowing leaves, which usually means too much light or overwatering. Adjust your light source or watering schedule as needed. Healthy roots should be firm and green, not shriveled or brown.
Fertilize your LECA orchid every 2-4 weeks with a balanced orchid fertilizer (like 20-20-20) diluted to half-strength. This feeds the roots without overwhelming them. I always fertilize after watering to ensure the nutrients are absorbed properly. Real talk: If your orchid isn't blooming, it might need more light or a rest period—cut back on fertilizer for a few months to encourage flowering.
🌿 Step 5: Encourage Blooming and Long-Term Care
To trigger blooming, orchids need a temperature drop of 10-15°F at night for 2-3 weeks. If your home stays too warm, place the orchid near a cooler window or use a small fan to simulate airflow. Once you see flower spikes, reduce fertilization to once a month to help the plant focus on blooming instead of foliage.
Every 6-12 months, repot your orchid into fresh LECA to refresh the growing medium. This prevents salt buildup and gives your orchid more space to grow. I like to repot in early spring before the growing season kicks off. With the right care, your LECA orchid can bloom 2-3 times a year—just keep those roots happy and well-aerated!
Tips & tricks for perfect LECA orchid care
Here’s what I’ve learned after watching orchids thrive in LECA—these little details make all the difference.
Root Health First: In Step 1, when you’re rinsing those LECA clay pebbles, don’t skip the drying step. Wet LECA can breed mold, and that’s the last thing you want near your orchid’s roots. Spread them on a clean towel and let them dry completely before using. This prevents bacterial issues that can rot roots before they even get a chance to grow. Think of it as giving your orchid a clean, sterile foundation—just like prepping a wound before bandaging.
The Right Depth Matters: When planting in Step 2, resist the urge to bury the rhizome too deep. The rhizome (thick base where roots emerge) should sit just above the pebbles—this encourages new roots to grow downward naturally. If you bury it too much, you’ll suffocate the plant and create a breeding ground for rot. I’ve seen orchids with roots growing out of the top of their pots because they were planted too shallowly, but that’s better than drowning them in LECA. Aim for that sweet spot where the rhizome peeks just above the surface.
Lighting is Non-Negotiable: For the 10-12 hours of grow light mentioned in Step 3, position your LED grow light 12-18 inches above the orchid. Too close, and you’ll scorch those delicate leaves; too far, and your orchid will stretch out like it’s reaching for the sun. I like to use a timer so my orchids get consistent light, even when I forget. And if you’re using natural light, east or west-facing windows are your best bet—south windows can be too intense, while north-facing ones often don’t provide enough.
Watering Wisdom: The 50-70% dry rule in Step 3 is your best friend. Lift the pot—if it feels heavy, it’s too wet. If it feels light, it’s ready for another soak. Overwatering is the silent killer of LECA orchids, and it’s easy to do when you’re used to soil-based plants. I’ve ruined more orchids by drowning them than by anything else. Pro tip: Use room-temperature water to avoid shocking the roots, and always drain thoroughly after watering. No one likes soggy feet, and neither do orchids.
Pro Tips for Grow Orchids In Leca
- Here’s what I’ve learned after watching orchids thrive in LECA—these little details make all the difference.
- Root Health First: In Step 1, when you’re rinsing those LECA clay pebbles, don’t skip the drying step. Wet LECA can b...
- The Right Depth Matters: When planting in Step 2, resist the urge to bury the rhizome too deep. The rhizome (thick ba...
Frequently asked questions
Got questions about growing orchids in LECA?
You’re not alone! Here are answers to the most common concerns—plus a few pro tips to keep your hydroponic orchids thriving.
How often should I water orchids in LECA?
Water your orchids in LECA when the top half of the pebbles feel dry to the touch—usually every 2–4 days, depending on humidity and temperature. Overwatering is the #1 killer, so always check moisture levels before adding water. A quick finger test saves roots from rot!
Can I reuse LECA from old orchid pots?
Yes, but sterilize it first! Rinse old LECA thoroughly, then boil or soak in a 10% bleach solution (1 part bleach to 9 parts water) for 5 minutes to kill algae, bacteria, or pests. Rinse completely before reuse—no residue left behind!
What if my orchid’s roots turn black or mushy?
Black, squishy roots = root rot, often from overwatering or poor drainage. Remove the orchid, trim dead roots with sterilized scissors, and repot in fresh, dry LECA. Let it dry out for 2–3 days before resuming watering. Prevention tip: Ensure your container has drainage holes! →
Do I need special fertilizer for LECA-grown orchids?
Yes! Use a balanced hydroponic fertilizer (like 20-20-20) diluted to half-strength every 2–4 weeks. LECA drains nutrients faster than soil, so frequent feeding is key. Flush the system monthly with plain water to prevent salt buildup. Pro move: Add a tiny bit of citric acid to soften water if yours is hard!
What’s a budget-friendly LECA alternative?
If LECA is hard to find, try expanded clay pellets (similar texture) or perlite mixed with coarse sand. Avoid fine gravel—it compacts and blocks airflow. For a free option, clean, rounded river rocks (1–2 inches) work in a pinch, but they lack LECA’s uniform drainage. →
Wrapping up and next steps
Growing orchids in LECA is a rewarding journey that blends innovation with nature’s beauty—no soil required! 🌱 By mastering the right mix of light, humidity, and watering techniques, you’ll unlock vibrant blooms and healthier roots. Remember, patience and consistency are key; your orchids will thrive with time and care.
Ready to take the next step? Experiment with different orchid varieties in LECA or even expand your hydroponic garden! Share your progress with fellow plant enthusiasts—your green thumb might inspire others to try this soil-free magic. Happy growing! 🌟